CAN YOU SPARE A MINUTE FOR WILDCARD MASK..  

Sunday, August 31, 2008

This is real simple ... but people sometimes gets confused and say

"how to do this ? is this the right way? " and so on...

lets include a small post for wildcard mask too...

let us you wanted to calculate the wildcard mask for 255.255.224.0

can you tell me in one second?? hehehe

simple


255-255 = 0

255-255 = 0

255-224 = 31

255 - 0 = 255


so wildcard mask would be

0.0.31.255..


LEARN SUBNETTING BEAST IN 5 MINUTES!!!!!  

The credit for this courses goes to MR.spacyfreak

He is currently pursing his ccsa and done with following
courses

CCNA / MCSE / MCSA / MCP / LPI
70-270 / 70-219 / 70-216 / 70-218 /
70-224 / 70-215 / 70-217 /
70-292 / LPI 101 / LPI 102
/ 640-801 / 642-502 / 642-551


You think Subnetting is a beast?
You think you have to be Superbrain to understand it?

You are wrong!

Here the step-by-step course.
After reading and some self-training, you should be able to
fix Subnetting-Questions in CCNA Exam without any
problems in a snatch.
Relax!

What is a Subnetmask?

With Subnetmasks, we can divide an IP-Address in
network-part and in host-part
.A given IP-Network can
be divided in smaller parts. Each of this smaller parts
is called a "Subnet".

If we for example have the network

192.168.10.0 255.255.255.0

We have here ONE Class C - network, with 253 useable
IPs for Client-PCs.


The useable IP Range of this network is

192.168.10.1 - 192.168.10.254


The very last IP of each Subnet is called Broadcast-Address.
This address is in that example 192.168.10.255 and
its NOT useable for host-pcs.

If we want to divide this network in two parts,
we must use subnetting.

With Subnetmask 255.255.255.128 we would
divide the network in
two parts.

192.168.10.1 - 192.168.10.127

192.168.10.128 - 192.168.10.255


So in this example, BEFORE we had one big Network.
With the change of the Subnetmask we did divide
it in two smaller networks.


First with Subnetmask 255.255.255.0 we had
THIS network:
192.168.10.0 >>> This is the
"Network-IP" which is NOT useable for
Host-PCs


192.168.10.1
192.168.10.2
192.168.10.3
192.168.10.4
192.168.10.5
...
...
...
192.168.10.253
192.168.10.254

192.168.10.255 >>>This is the Broadcast-IP, which is NOT
useable for Host-PCs


Now with Subnetmask 255.255.255.128 we have
THIS two networks:


First Subnet:

192.168.10.0 >>> This is the "Network-IP" which is NOT
useable for Host-PCs


192.168.10.1
192.168.10.2
192.168.10.3
192.168.10.4
192.168.10.5
...
...
...
192.168.10.125
192.168.10.126

192.168.10.127 >>>This is the Broadcast-IP, which is NOT
useable for Host-PCs


Second Subnet:

192.168.10.128 >>> This is the "Network-IP" which is
NOT useable for Host-PCs


192.168.10.129
192.168.10.130
192.168.10.131
192.168.10..132
192.168.10.133
...
...
...
192.168.10.253
192.168.10.254

192.168.10.255 >>>This is the Broadcast-IP, which is
NOT useable for Host-PCs


The Subnetmask defines how big the subnet is.
That means - how many Client-PCs will have place in
that subnetwork.

A Subnetmask of 255.255.255.0 means in binary

11111111.11111111.11111111.00000000

So, what do we see?

4 Blocks, divided with a ".". Each of these blocks is also
called "octett".Because - each Block has 8 bits.

To be able to do subnet-calculation, we first must
understand binary calculation.


Lets take the first block.

The first "1" stands for a 128.

The second "1" stands for a 64.

The third "1" stands for a 32.

The fourth "1" stands for a 16.

The fifth "1" stands for a 8.

And so on. That means:

11111111=255

11110000=240

11100000=224

If we see something like "/24", that means that
24 bits are set to "1",
from the left side.

Examples:

/16 = 255.255.0.0 = 11111111.11111111.00000000.00000000

/20 = 255.255.240.0 = 11111111.11111111.11110000

If we would take a subnetmask of 255.255.255.255 that would
be

128+64+32+16+8+4+2+1.128+64+32+16+8+4+2+1.
128+64+32+16+8+4+2+1.
128+64+32+16+8+4+2+1

and in binary it would be

11111111.11111111.11111111.11111111

Calculation of Subnetmask big enough for a
specified number of Hosts


If they ask..

"create a subnet with minimum 10 host IPs"

than

1. calculate a power of two, that is minimum 10

2^3=8. That is not enough
2^4=16 That is higher than 10. Good.


2. Now put the LAST 4 Bits of your subnetmask to 0.

11111111.11111111.11111111.11110000

That is in decimal

255.255.255.240

With THIS Subnetmask, you have minimum 10 Host-Ips
in the Subnet,without wasting to much IP-Addresses.

------------------------------------------------------------
Other example

If they ask

Create a subnet with minimum 70 Host-IPs

1. Calculate a Power of 2 that is MINIMUM 70

2^6=64. Not enough.
2^7=128. Thats higher than 70. Good.

2. Put the LAST 7 Bits of your Subnetmask to 0.

11111111.11111111.11111111.10000000

That is in decimal

255.255.255.128

You have a Subnetmask, with more than 70 Host-IPs.


-------------------------------------------------------------------------

Calculation what is the Broadcast-IP of a Subnet

When they ask
"There is subnet 172.16.64.0/20. What is the BROADCAST
ADDRESS
of that Subnet ,dude?"


1. Step

/20 meens 255.255.240.0

2. Step

Now analyze the Subnet Oktett to find out the
"network-jumps"

240 means 11110000

The LAST of the 1s is under decimal 16.
That are our "network jumps"
(128/64/32/16/8/4/2/1)
3. Step

Write down the network-jumps


172.16.64.0 - 172.16.79.255
+16 172.16.80.0 - 172.16.95.255
+16 172.16.96.0 - 172.16.111.255
+16 172.16.112.0 - 172.16.127.255

Because the NEXT Subnet in the example is
172.16.80.0, the broadcast must be 172.16.79.255,
cause THAT is the IP BEFORE the next
Subnet starts = the BroadcastAddress.


------------------------


Other example of Broadcast-IP calculation:

If it would be 172.16.64.0 /26

Same procedure

/26 means 255.255.255.192


192 is binary 11000000
The LAST 1 stands under the 64.
That are in that example our "net-jumps".

172.16.64.0 - 172.16.64.63 <<64 - 172.16.64.127
172.16.64.128 - 172.16.64.191


---------------------------------------------------------------------

Calculating first and last possible IP for a Host

You have Network 192.168.20.32 /27
The very first IP is reserved for Default Gateway!
What is the first and last valid IP for a Host-PC?

1.Step

/27 is 255.255.255.224

2.Step

224 means 11100000

The LAST 1 is under the 32.
That are our "network-jumps" in this example
(128/64/32/16/8/4/2/1)

Valid IPs in that subnet:

192.168.20.33 - 192.168.20.62

(192.168.20.63 is NOT useable, this is the very

last IP and so the BROADCAST-IP).

192.168.20.64 <<So, because the very first IP is
reserved

for Default Gateway, our first Host-PC IP would be
192.168.20.34

The very last Host-PC IP would be
192.168.20.62


###################################################################

Here some examples of real exam questions, and
step by step solutions
:


Given that you have a class B IP address network range,
which of the subnet masks below will allow for 100
subnets with 500 usable host addresses per subnet?
A. 255.255.0.0
B. 255.255.224.0
C. 255.255.254.0
D. 255.255.255.0
E. 255.255.255.224

Solution:

Allways the same game... Like in 5 minute course..

Power of 2 that is minimum 500?
2^7=128
2^8=256
2^9=512 >>voila!

Now - put the last 9 Bits of your Subnetmask to "0"

11111111.11111111.11111110.00000000

That is in decimal
255.255.254.0


=====================================================================
If a host on a network has the address 172.16.45.14/30,
what is the address of the subnetwork to which this
host belongs?
A. 172.16.45.0
B. 172.16.45.4
C. 172.16.45.8
D. 172.16.45.12
E. 172.16.45.18

Solution:

172.16.45.14/30

/30 means 11111111.11111111.11111111.11111100

The last of the ones stands under the "4".
That is our increment or network jump.
172.16.45.0 - 172.16.45.3
172.16.45.4 - 172.16.45.7
172.16.45.8 - 172.16.45.11
172.16.45.12 - 172.16.45.15
172.16.45.16 - 172.16.45.19

As we see, the Ip is in the Range of
172.16.45.12 - 172.16.45.15.
So the network Address is 172.16.45.12


=================================================
QUESTION NO: 9
Which two of the addresses below are available for
host addresses on the subnet 192.168.15.19/28?
(Select two answer choices)
A. 192.168.15.17
B. 192.168.15.14
C. 192.168.15.29
D. 192.168.15.16
E. 192.168.15.31
F. None of the above

Solution:

/28 means 11111111.11111111.11111111.11110000

The last 1 stands under the 16. This is increment
or network-jumps.

192.168.15.0 - 192.168.15.15
192.168.15.16 - 192.168.15.31
192.168.15.32 - 192.168.15.47

Only A and C are IPs in the right range.
Also E is in the right range.
But - this is not useable for hosts,
cause its broadcastaddress.
So answer is A and C.


################################################################

-------------------------------------------------------------------------------------------------------------------------

Calculation of Wildcard-Masks
(Needed for Access Lists and OSPF Configuration)

You have Network 192.168.32.0 /28
Only THIS network should be denied of accessing a network
or server.

1. Step
calculate the wildcard mask

/28 means 255.255.255.240

binary this is

11111111.11111111.11111111.11110000

For wildcard-mask only the ZEROS are interesting.

11110000 Make a addition of all the fields, that are set to zero

128/64/32/16/8/4/2/1
That is 8+4+2+1=15

So the wildcard-mask will be
0.0.0.15

access-list will be

access-list 1 deny 192.168.32.0 0.0.0.15
access-list 1 permit ip any any

now, we have to bind that access-list to a routerinterface.
In the example, this is e0.

interface e0
ip access-group 1 out (or in!)
exit

-------------------------------------------------------------------------------------------------------------------------


PS.

Its good to write on a BIG paper the powers of 2

2^2=4
2^3=8
2^4=16
2^5=32
2^6=64
2^7=128
2^8=256
2^9=512
2^10=1024
2^11=2048
2^12=4096

And write on that paper the numbers

128 192 224 240 248 252 254

Cause this are the Numbers, you will allways need
in calculating Subnets.

Burn them in your mind! Hang the paper in front
of your eyes to never forget them.Then you will be able
to calculate Subnets in your head in a half second!

Isnt live easy?


A LITTLE BIT ABOUT MEMORY MANAGEMENT AND OPTIONS  

Saturday, August 30, 2008


SIMPLY CHECK OR TICK SPARSEMEM WHICH IS NOT TICK BY DEFAULT IN THE GNS3 SECTION

THE REASON BEHIND THIS IS AS FOLLOWS ....

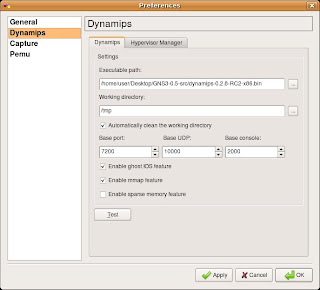
Memory Usage Labs can consume a large amount of real and virtual memory. The “ghostios” and “sparemem” options were added to address both of these issues, respectively.
The Ghostios option can significantly reduce the amount of real host RAM needed for labs with multiple routers running the same IOS image. With this feature, instead of each virtual router storing an identical copy of IOS in its virtual RAM, the host will allocate one shared region of memory that they will all utilize. So for example, if you are running 10 routers all with the same IOS image, and that image is 60 MB in size you will save 9*60 = 540 MB of real RAM when running your lab. Ghostios is enabled, by default, in GNS3.
The “sparsemem” feature does not conserve real memory, but instead reduces the amount of virtual memory used by your router instances. This can be important, because your OS limits a single process to 2 GB of virtual memory on 32-bit Windows, and 3 GB on 32-bit Linux. Enabling sparsemem only allocates virtual memory on the host that is actually used by the IOS in that router instance, rather than the entire amount of RAM configured. This can allow you to run more instances.
Both features rely on mmap, so this must also be enabled. Select Preferences under the Edit menu within GNS3. Check the appropriate boxes to enable these features.


CREDIT GOES TO MIKE

Few Enhancements  


Credit goes to Mike fuszner @ gns3 for the following suggestions .....

TO our gns3 we can do few more enhancements to make ourself more comfortable ... first thing it to ....change the telnet client ... you can have either putty or teraterm both are good to have i prefer putty ....

PuTTY: http://www.chiark.greenend.org.uk/~sgtatham/putty/
TeraTerm: http://hp.vector.co.jp/authors/VA002416/teraterm.html

Just download the terminal program you prefer and install it on your computer. Inside GNS3, choose Preferences under the Edit menu. Choose General in the left pane, and the change the Terminal command box to read:
For PuTTY: c:\putty\putty.exe -telnet %h %p
For TeraTerm: c:\ TTERMPRO\ttssh.exe %h %p /W=%d /T=1


so we are done with this ....

If you are using a topology that opens several console windows, it becomes a bit of a challenge switching from one device to another. You may consolidate all of these windows into one application where the windows are located under tabs. There are several ways to do this, but the program I like is called WinTabber. It’s another free download at the following site:
http://www.wintabber.com/


after the download click on wintabber and go to file ---> add tab ---> add the tabs of your choice they all would be under one roof ...

CAN YOU SEE THE MULTIPLE TABS ...
regards
RAKESH

ORIGINAL CONFIGURATION  

The configuration is absolutely simple .. it used to be hard for me as i dint have any guides to follow .. now there are many ways to follow a tutorial and install gns3 with little or no pain ...

---------------------------------------------------------------------------------------------------

BEGIN OF STEP 1

so first and foremost step is to download the latest copy of gns3 from their website ...

you can do it from here

now after doing it the installation is straight foreward and clicking next will do ...

END OF STEP 1

---------------------------------------------------------------------------------------------------


STEP 2

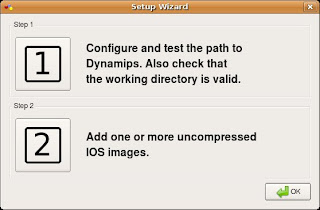
click 1 and do as below

click on test .. and if any alert comes choose ublock


You need to start the dynampis server and make sure you get a message like this

"DYNAMPIS SERVER STARTED SUCCESSFULLY"


-------------------------------------------------------------------------------------------------

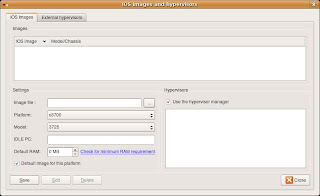
STEP 2 : loading ios ...

you need to have your own cisco ios .....

click on number two to get the below screen ...


or alternatively open gns3 ---> preferences ---> ios images

*MAIL ME IF YOU HAVE ANY ISSUES WITH STEP 2
------------------------------------------------------------------------------------------------

STEP 3


now kickoff with gns3 ... we will drag a simple router for which ios has been added ... and start the router in the following way


rightclick on router and click on start .....


---------------------------------------------------------------------------------------------------
STEP 4.

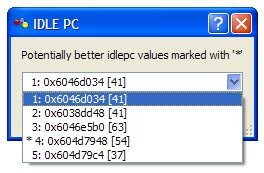
you are done ... now the most important step is to configure idlepc value

before doing or calculating idlepc value

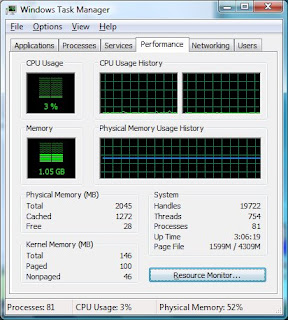
hit ctrl + alt + del and see the cpu utilisation .. and to no surprise you will see it be 100%

now this could be trouble some , in order to bring down the cpu usage you need to calculate idlepc value ..


rightclick on router and hit on idlepc ... you will presented with the following image ... select the idlepc value with asteric * mark


after idlepc value the cpu utilisation should be reduced and you should see a low cpu utilisation like this


you should be seeing the following image ...


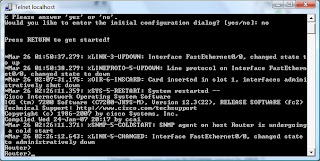
After Applying the idlepc value... thats it ... its time for console and configuration of you router which behave as if like a original cisco one ... the following are the shots of the images from my console ...


-


-------------------------------------------------------------------------------------------------

saving the configuration

This is the crucial part as you cant save your config when you normally do with the save button .. i have experienced a lot of problems with saving finally i could get out of this ...

after you are done with the configuration part ..

goto file ----> new(project) #here dont go for file go for project# ---- select yes ...

and you are done bingo


------------------------------------------------------------------------------------------------


CONGRATULATIONS YOU HAVE YOUR CISCO ROUTER RUNNING ....

any issues feel free to comment ...

regards
RAKESH


IMPORTANT FIRST STEP IS TO CONFIGURE GNS3  

hai as all of you know , accessing a cisco router or buying it is very hard and only few people can afford that ... so people start practicing on bad simulators ... and they dont get the concept .. at ccna and ccnp level it is important to learn concept with original ios as we will be aiming for a ccie ...


the reason behind this is simple .. simulators are programmed by a programmer who inputs maximum number of commands he knows .. he cannot put a cisco ios in the simulator... so most of the commands wont work for real life on a sim ..

in order to overcome this people started using gns3 ... graphical network simulator ... you still thinking by the name as it is called a simulator .. yes its a stimulator but uses the original cisco ios and this is what makes it original .. and it will behave as a router when installed on a computer ...

it can be used to practice all the ios commands and codes unlike an dupe sim...

so here we go ...

Hello EveryOne  

Hai all ..... Iam Rakesh..Looking at my ccie senior friends who are yet to take the lab i got an idea of preparing for ccie from ccnp level it self ... i have started already and started primarily with gns3 simulator ... i would be posting about gns3 and how to configure it and use it ....


The following would be my study plan for the rest of bsci course ... i will be posting all the info regarding that .. so be in touch and post any problems you are facing regarding any thing i would be more than happy to help you ..

################################################################################
###################

I will go with module wise first i will start of with GNS3 and after that ccnp bsci and ccie bsci

GNS3

gns3.net the tutorial pdf

hacki website (setting up an access server)

cbt nuggest ccie (tips and tricks for router aliases)

few tricks from scott morris for ccie lab...(creating aliases and using shortcuts and reloading routers time to time etc for lab every day )

################################################################################
###################

next is with the BSCI series


CISCO STUDENT STUDY GUIDE

CBTT CCNP

CISCO CCIE STUDENT GUIDE R AND S

CISCO CCIE IPEXPT BSCI CONCEPTS

CISCO CCIE CBT R AND S BSCI CONCEPTS

CBTT LABS

CCIE WRITTEN LABS

CCIE IPEXPT LABS

CISCO EXAM GUIDE

TRAIN SIG

HACKI SITE

################################################################################
###################


good luck

regards
RAKESH

Design by Blogger Buster | Distributed by Blogging Tips