ORIGINAL CONFIGURATION
Saturday, August 30, 2008
The configuration is absolutely simple .. it used to be hard for me as i dint have any guides to follow .. now there are many ways to follow a tutorial and install gns3 with little or no pain ...
---------------------------------------------------------------------------------------------------
BEGIN OF STEP 1
so first and foremost step is to download the latest copy of gns3 from their website ...
you can do it from here
now after doing it the installation is straight foreward and clicking next will do ...
END OF STEP 1
---------------------------------------------------------------------------------------------------
STEP 2
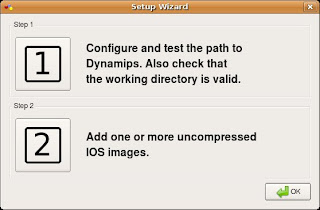

click 1 and do as below
click on test .. and if any alert comes choose ublock
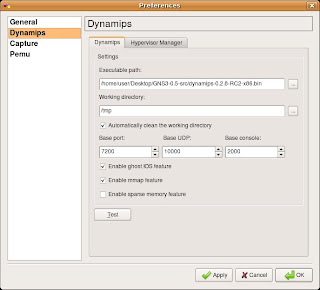
You need to start the dynampis server and make sure you get a message like this
"DYNAMPIS SERVER STARTED SUCCESSFULLY"
-------------------------------------------------------------------------------------------------
STEP 2 : loading ios ...
you need to have your own cisco ios .....
click on number two to get the below screen ...

or alternatively open gns3 ---> preferences ---> ios images
*MAIL ME IF YOU HAVE ANY ISSUES WITH STEP 2
------------------------------------------------------------------------------------------------
STEP 3
now kickoff with gns3 ... we will drag a simple router for which ios has been added ... and start the router in the following way
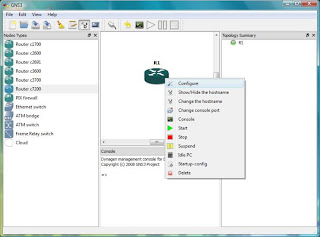
rightclick on router and click on start .....
---------------------------------------------------------------------------------------------------

rightclick on router and click on start .....
---------------------------------------------------------------------------------------------------
STEP 4.
you are done ... now the most important step is to configure idlepc value
before doing or calculating idlepc value
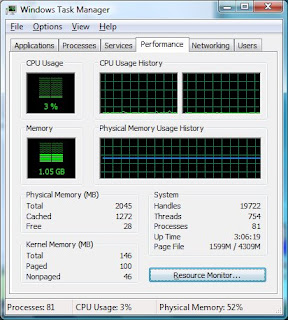
hit ctrl + alt + del and see the cpu utilisation .. and to no surprise you will see it be 100%
now this could be trouble some , in order to bring down the cpu usage you need to calculate idlepc value ..
rightclick on router and hit on idlepc ... you will presented with the following image ... select the idlepc value with asteric * mark
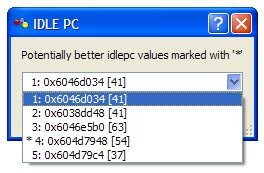
after idlepc value the cpu utilisation should be reduced and you should see a low cpu utilisation like this
you should be seeing the following image ...
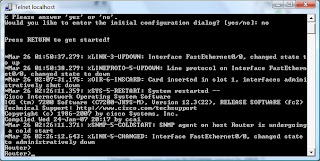
After Applying the idlepc value... thats it ... its time for console and configuration of you router which behave as if like a original cisco one ... the following are the shots of the images from my console ...
 -
-
-------------------------------------------------------------------------------------------------
you are done ... now the most important step is to configure idlepc value
before doing or calculating idlepc value
hit ctrl + alt + del and see the cpu utilisation .. and to no surprise you will see it be 100%
now this could be trouble some , in order to bring down the cpu usage you need to calculate idlepc value ..
rightclick on router and hit on idlepc ... you will presented with the following image ... select the idlepc value with asteric * mark

after idlepc value the cpu utilisation should be reduced and you should see a low cpu utilisation like this
you should be seeing the following image ...

After Applying the idlepc value... thats it ... its time for console and configuration of you router which behave as if like a original cisco one ... the following are the shots of the images from my console ...
 -
--------------------------------------------------------------------------------------------------
saving the configuration
This is the crucial part as you cant save your config when you normally do with the save button .. i have experienced a lot of problems with saving finally i could get out of this ...
after you are done with the configuration part ..
goto file ----> new(project) #here dont go for file go for project# ---- select yes ...
and you are done bingo
------------------------------------------------------------------------------------------------
CONGRATULATIONS YOU HAVE YOUR CISCO ROUTER RUNNING ....
any issues feel free to comment ...
regards
RAKESH